Jia Dashboard LogoJia Name Logo
Help
Center
Contact Support
Jia Dashboard LogoJia Name Logo
Powered by White Cloak Technologies, Inc.20th Floor, F. Ortigas Jr Strata 2000 Building
San Antonio, Ortigas Center, Pasig, 1605 Metro Manila
LinkedInFacebookTikTok
Sales Team: inquire@hellojia.ai
Development Team: hello@whitecloak.com
© Copyright 2026. All rights reserved.
HomeChevron RightDocumentationEmailChevron RightCustom Domain
Getting started
  • Customize your Dashboard
Careers
  • Create your first career
  • Create a linked career
  • Update career status
  • Customize career settings
Application Timeline
  • Endorse a candidate
  • Drop a candidate
  • Reconsider a candidate
Candidates
  • Import a candidate
  • Quick Search
  • AI Search
  • Advanced Filters
  • View a candidate profile
  • Add a comment
  • Invite to a job
Organization
  • Invite new members
  • Roles
Job Portal
  • Apply to a job
  • AI Interview
  • Manage CV
Subscription, Billing, and Support
  • Subscription Plans
Projects
  • Create a project
  • Link a career
Requisition
  • Create a requisition
  • Requisition Approval
Talent Vault
  • Set-up Talent Vault
Email
  • Inbox
  • Templates
  • Automations
  • Reminders
  • Bulk Email
  • Integration
  • Custom Domain
Miscellaneous
  • Notifications
  • Feedback
Custom DomainLast updated: 04 Apr 2026
Email

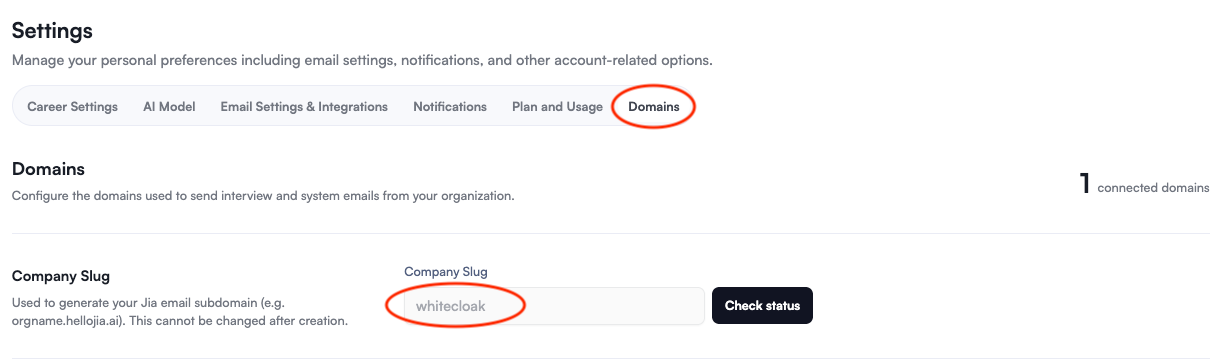
There are two primary ways to set up your email identity within the platform. Choose the option that best fits your technical setup and branding needs.

Option 1: Using a HelloJia Subdomain

Best for: Quick setup or companies that want to keep recruitment emails separate from their main corporate inbox.

Request the Subdomain: In your HelloJia dashboard under Settings > Domains > Company Slug and enter your desired prefix.

Example: companyname.hellojia.ai

custom-domain-01.png

Option 2: Using a Custom Domain (Direct DNS)

Best for: Brand consistency if you do NOT use Google/Outlook for your business email. (Note: If you have a domain like @company.com but no email service attached to it).

Add Domain in HelloJia

  • Go to Settings > Domains > Company Domains and follow the following DNS Set up Instructions: custom-domain-02.png
  • To complete setup, you'll need to add the DNS records shown below to your domain provider (e.g. Cloudflare, GoDaddy, Namecheap).
    • Step 1: Add DNS Records
      • Log in to your domain provider and navigate to the DNS management section. Add the required DNS records as shown in the domain records modal.
    • Step 2: Wait for DNS Propagation
      • DNS changes can take up to 24-48 hours to propagate globally. Most changes take effect within a few hours.
Pro-Tip

You can use online DNS checkers to monitor propagation status across different regions.

  • Step 3: Verify Your Domain - Once DNS records are added, click the 'Verify status' button in the domain records modal to check if your domain is properly configured.
    • Step 4: Start Sending Emails
      • After verification is complete, your domain will be active and ready to send interview and system emails on behalf of your organization.
Important Compatibility Note

Are you using Gmail or Outlook? If your organization already uses Google Workspace or Microsoft 365, do not use the DNS method above. It is much better to use the Gmail or Outlook integration found under Email Settings & Integrations. This ensures higher deliverability and prevents conflicts with your existing business email.

Was this article helpful?
Loading feedback…